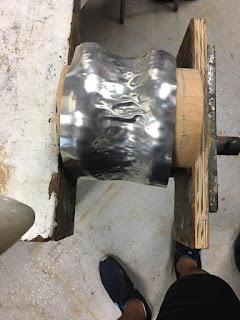
The Torus
Step 1: A large
sheet of metal has handed to a few students in order for them to measure and
cut a piece each from the larger sheet.
A ruler and scribe were used to measure and mark the shape,
in this case a large rectangular shape.
Following this, the guillotine machine was utilised to
uniformly cut the sheet of metal as clean and accurate as possible. Following
this, I was able to begin work to create the torus.
Step 2: To begin
the process, the tutor had created a wooden chuck that would suit the students
with larger pieces of metal. This in turn meant that a lot more work had to be
done with the mallet and flat head hammer in order to achieve a clean finish.
Step 3: The metal
sheet was then placed over the jig, which was held in place using the vice
attached to the workbench. Because the jig is round shaped, my metal sheet had
to be bent around the shape of it so that I could keep it in place and hence
begin working on it.
The mallet was once again used in this project as the
necessity for shrinking and expanding was evident. The jig was a round chuck
that had been cut into to create a curved shape hence allowing the metal sheet
to be hit into it, acting as a bed for the sheet to be pushed down on,
ultimately creating a dip shape.
Step 4: Using the
sharp side of the mallet I was able to shrink the middle of the sheet and push
it down into the shape that was cut below to create a reverse curve. It was
vital that I didn’t abuse the metal sheet as it would become damaged and could
lead to imperfections later on.
Note: it was
important to also hit the mallet on an angle to work with the curve rather than
against it as it would leave unwanted marks on the body of the torus. This
process was repeated consistently until the desired shape was achieved and I
was able to begin working on the outer curve.
Step 5: Following
the completion of the inner curve, I was then able to being working on the
reverse curve along the two parallel sides. This was achieved by using a firm
piece of metal as something to lean on in conjunction with the flat head
hammer. This allowed a smaller curve to be created, which juxtaposed the inner
curve.
This process was repeated until the entire project was at a
desired shape and in condition for finishing.
NOTE: The process
became hard at times due to the fact that the piece was so large, it prolonged
the process and even caused errors and the metal sheet even tore and ripped in
certain parts as it was stretched too much. To combat this, I effectively
shortened the piece that I was using so that a natural curve could be achieved
as the long piece I was using tended to be more of a peak instead of a gradual
curve. After cutting the metal sheet I was able to effectively achieve and work
on the curve to obtain a better overall finish.
Step 6: Following
this I was able to easily work on the curve and the imperfections that once
existed were removed, making my work easier to work with. I then turned to the
English Wheel once again to smooth out the bumps caused by the hammering and
attempted to create more a curved surface.
At the completion of the lesson I was not satisfied with the
work completed and therefore took my project home and worked on a few things
from home using random surfaces and tools I had. This helped in my progress to
finishing.
Step 7: Finally I
filed the sharp edges all around the torus and when I was happy with the finish
and curve on my torus I turned to sanding with 100p sand paper to get the
smoothest finish possible. To showcase the end result and test the accuracy of my curve
I used a metre as well as photographing the torus at an angle that showcases
how even the end product was.
Note: throughout
the whole process PPE was used in the form of face masks, ear plugs and safety
glasses.


Comments
Post a Comment